As a newly arrived expat, you might be wondering… What the heck’s an RFC number? And why would I ever need one?
RFC stands for el Registro Federal de Contribuyentes. It functions as a tax ID in Mexico, and is comparable to a social security number in the United States.
In early 2022, Mexico’s federal government passed a law making it mandatory for all Mexican citizens and lawful residents to get an RFC number. At first, the RFC was meant for Mexican citizens and permanent residents only, however, expats with Temporary Residency status have also increasingly been unable to complete ordinary daily activities without one.
The reasons behind making RFCs mandatory for all residents were to provide greater fiscal accountability, crack down on tax evasion, and increase government revenues. I’d bet the last one weighed most heavily!
RFC numbers are issued by SAT offices in every Mexican state. “SAT” is Mexico’s equivalent of the IRS.
To be specific, RFC numbers are now required for myriad financial transactions that didn’t previously require one, so they’re now a necessity for virtually any long-term resident.
Below are common activities an expat might do that either require an RFC or trigger large fees without one:
-
- Open a local bank account
-
- Sell or rent property to others
-
- Put a utility bill in their name
-
- Buy a car
-
- Start a business or work for a Mexican company
-
- Sell stuff on Mercado Libre or Ebay Mexico
If you have no plans to engage in any of the above activities there’s no reason to go to the trouble of getting a RFC number. It’s probably not worth the hassle.
With regard to real estate, while you don’t need an RFC number to buy property (even tourists can buy property in Mexico), it’s smart to get one if you own a home and someday plan to sell it or rent it out. Because the capital gains tax in Mexico is a steep 25% before deductions, having an RFC number when selling property saves you a boatload of cash.
Assuming you meet all the criteria, the RFC allows you to claim a capital gains tax exemption for your primary residence. And if you and your spouse jointly own property here, you both need an RFC number to claim the full benefit.
Renting property via Airbnb or selling stuff online will also incur assorted tax liabilities to the Mexican government. These are tracked via RFC numbers. For more detailed information on paying taxes in Mexico, consult a local tax advisor.
If I’ve still got your attention, you’re probably convinced you need an RFC number.
How to get an RFC Number
There are many wonderful things about living in Mexico, but dealing with the bureaucracy isn’t one of them. Let’s not mince words–Mexico’s bureaucracy can be a real dumpster fire.
Of all the tasks we’ve tried to complete at government agencies over the past 15 months, I thought that getting an RFC number would be one of the easiest. Unfortunately, everything I read online to prepare myself for my appointment was not enough to get it done in one trip.
It turns out I was missing one essential document so got turned away, and was forced to start the entire process over from the beginning. They also put those who fail in a sort of “penalty box” with a 30-day waiting period before allowing you to request another appointment. No bueno.
The fact is, online resources quickly become out-of-date because Mexico’s bureaucracies are constantly changing the rules. Additionally, since practices often differ by state and by office (and sometimes by bureaucrat!), you’re advised to supplement any online research you do with boots-on-the-ground investigation to be as prepared as possible.
Below is a step-by-step guide to getting an RFC number
1. Go to the SAT website and start on this page to request an appointment: https://citas.sat.gob.mx/datosPersonales
2. Choose the 3rd option “Inscripción al padrón de contribuyentes Personas Físicas” (This option is for individuals. “Personas Morales” is for companies)
3. Enter your CURP number, full name, and email address.
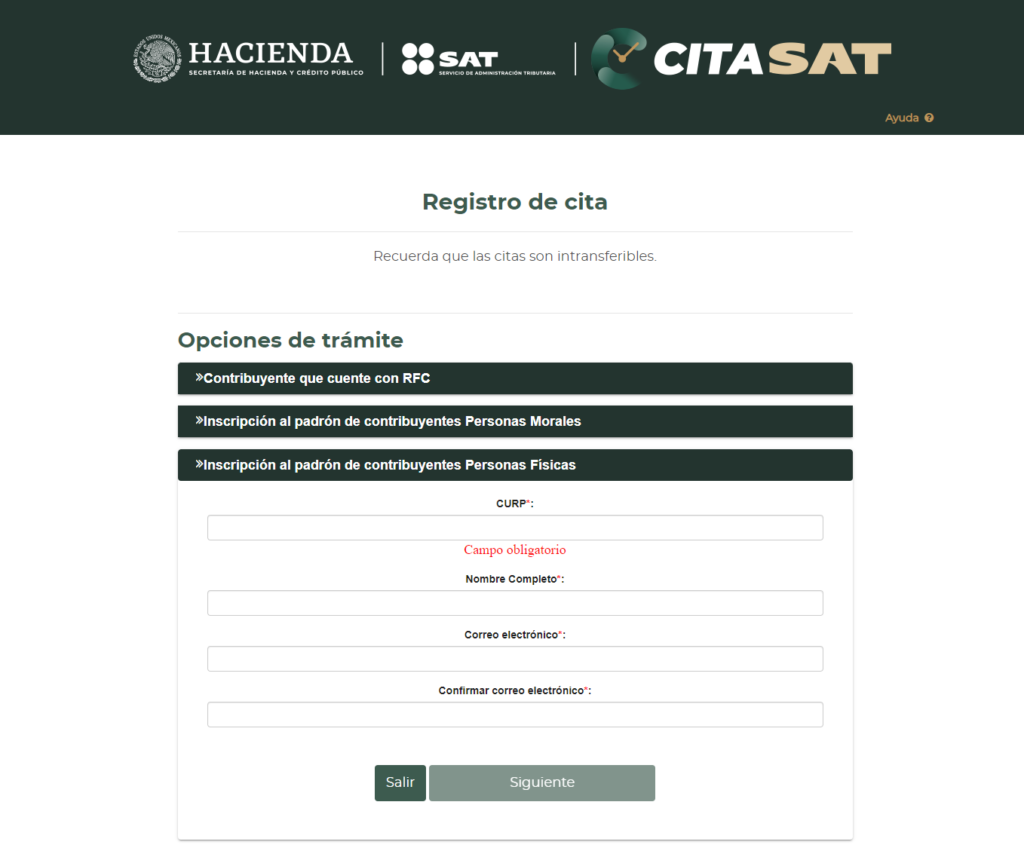
4. Accept Terms & Conditions.
5. Complete the CAPTCHA puzzle and then click “Siguente.”
6. On the next screen under Servicios, from the dropdown menu choose “Inscripción en el RFC de Personas Físicas”
7. Under Entidad Federativa, choose your state from the dropdown.
8. Under Modulo, choose the local SAT office you want to visit.
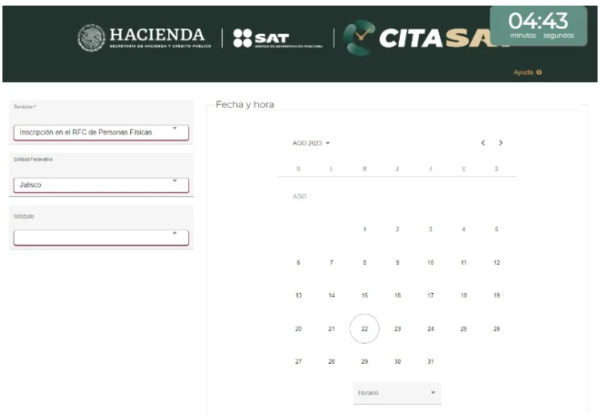
9. This next part of the process is time-based, so be sure to stay the course so you don’t have to start over!
Because SAT offices are overloaded with demand, you’re likely to see a message overlaying the screen stating that an appointment cannot be offered at this time, but you can join the virtual line and be notified when one becomes available. If this happens to you, click “Fila virtual” button in the lower right.
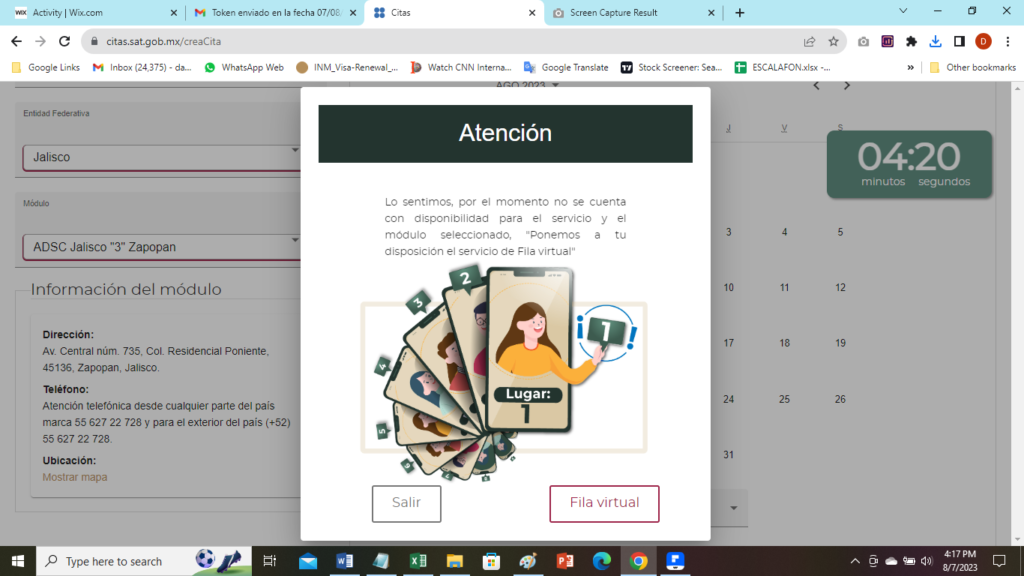
If instead, you’re still able to see the big calendar after choosing a local office, it’s your lucky day because you can directly select an appointment from the website. Nice work!
You are looking for dates on the calendar, highlighted in green. If nothing is green for the current month, advance the calendar to the next month to see if dates are available further out. The website doesn’t tell visitors how to find appointments — we stumbled into available dates 4 weeks out while frantically clicking around before the page timed out. Note to UX designers — aim higher!
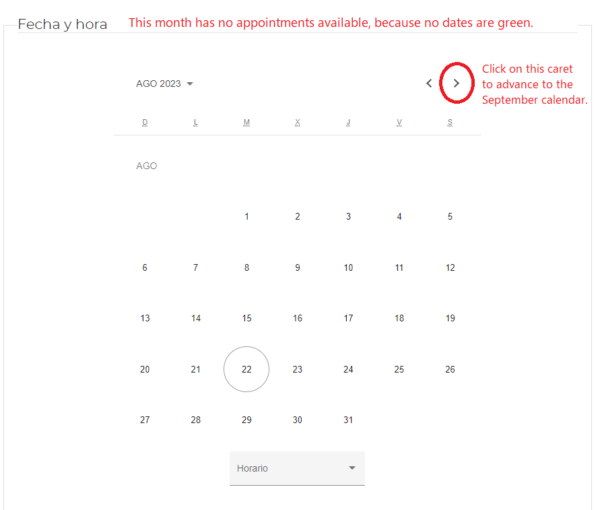
Once you find dates highlighted in green, choose one. Next, click on the “Horario” dropdown below the calendar to see available times. Finally, click the button “Generar cita” to confirm your selection. We were so excited to see available dates that we failed to grab a screenshot of this page!
9. If you are offered the virtual line instead, after clicking “Fila virtual” you will receive a token via email to confirm your entry into the virtual line. Go to your email (the one entered in the previous step) to find a message sent by “avisocitas.”
10. Type the token into the window and click “Confirmar.”
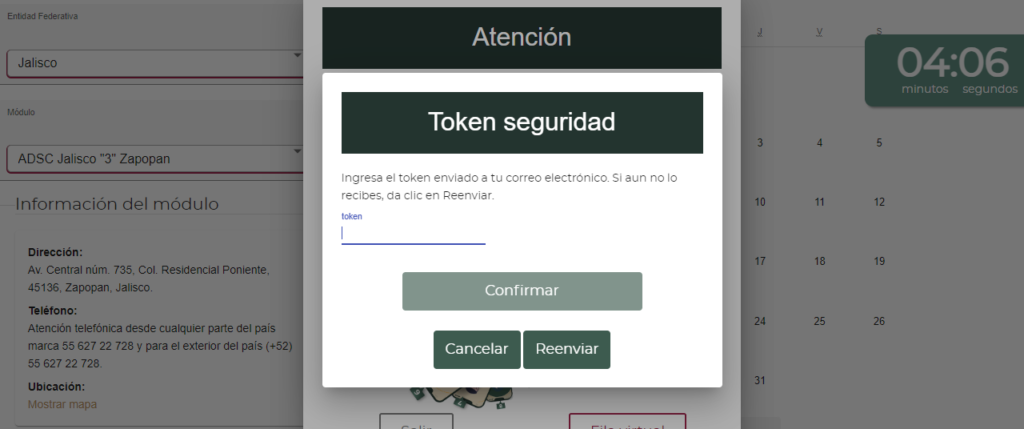
If you don’t receive the token via email, click “Reenviar” to get another one sent to you.
11. Once you’ve submitted the token and successfully entered the virtual line, you’ll receive another email confirming it. Now, you just have to wait….
How long it takes to be offered an appointment depends on how backlogged the SAT office is that you’ve chosen.
12. Within 24 hours of being added to the virtual line in Zapopan, I received another email saying an appointment was available (10 days out).
When you receive an appointment notification via email, you have 24 hours to confirm to avoid losing it.
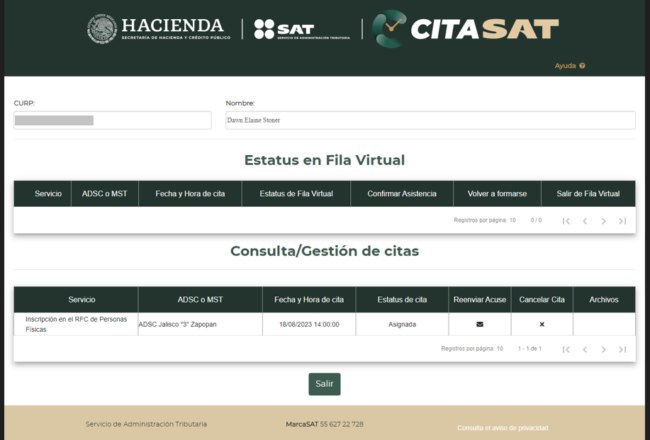
13. To confirm the appointment offered, simply follow the steps in the email. When you reach the page showing your details under “Estatus en Fila Virtual” alongside the appointment date you’ve been offered, click on “Confirmar Asistencia” to accept it.
14. This will generate a new email confirming your appointment. It also triggers a change of status in the Consulta/Gestion de Citas table directly below it. When your appointment is confirmed you should see “Asignada” under “Estatus de cita” in the Consulta/Gestion de Citas table, as in the example shown below.
If you can’t make the first date and time offered, you may decline it, and the site will provide you with a second option. If you get this far, don’t push your luck — try to make the second date work!
REMEMBER: If you do nothing in that 24-hour window after receiving the email with a proposed appointment date, you will lose it and be dropped out of the queue. Then it’s back to square 1. No soup for you!
If you don’t receive an email within a few days of entering the virtual line offering you an appointment, you can still check your status in the virtual line by following these steps:
1. Visit https://citas.sat.gob.mx and select the option on the right that says “Consultar/Gestionar cita.
2. On the next screen check the box that says Consulta de cita para el servicio de Inscripción Persona Física
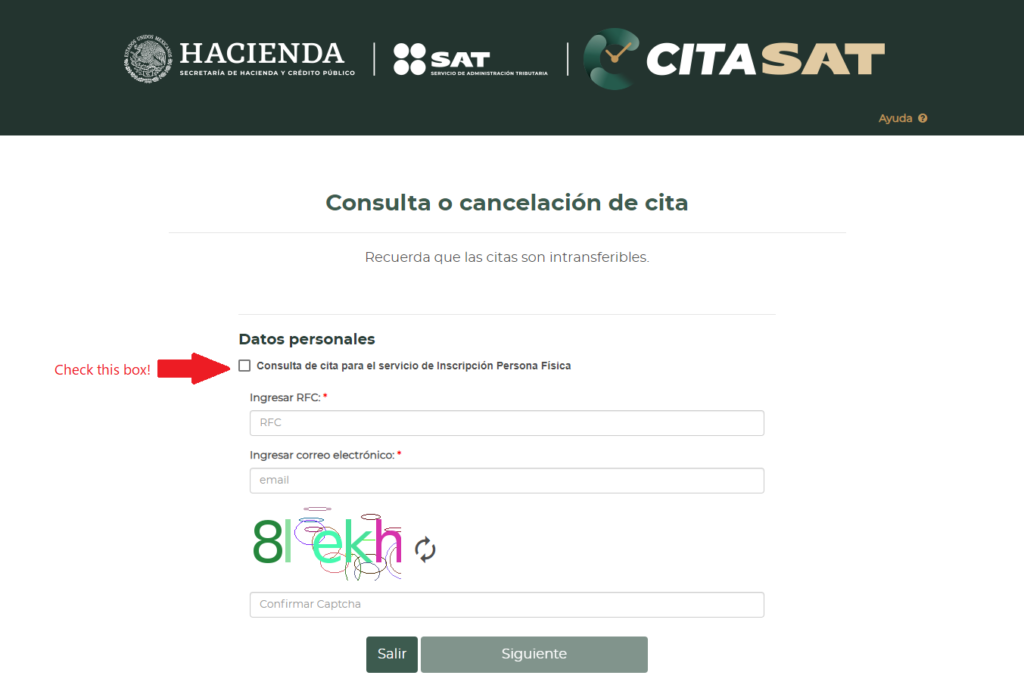
3. Enter your CURP number, name and email address, then complete the CAPTCHA puzzle and click “Siguiente.”
4. On the next screen, copy and paste the virtual token they send you via email.
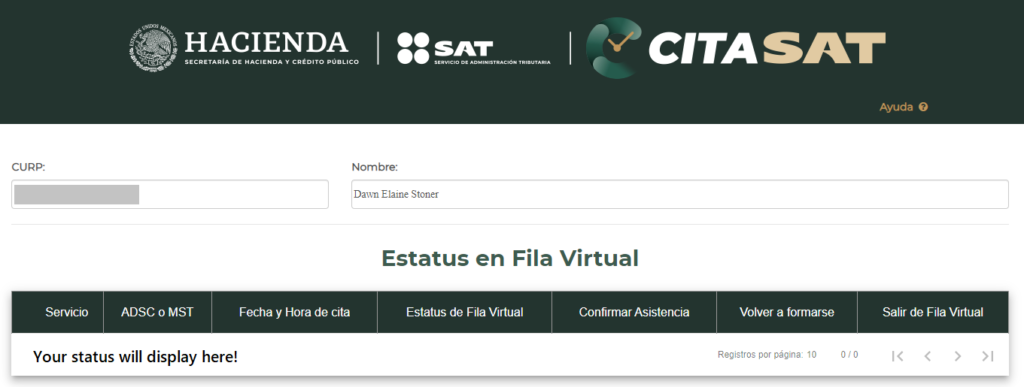
5. The screen that loads next should display your status in the virtual line (top table).
What to bring to your SAT appointment – in Jalisco
While SAT will send you a list of required items, their list isn’t accurate, with some items needed, some not needed, and some items missing entirely. As noted above, the rules change so often that official documentation frequently can’t keep up. This is just how it goes with the Mexican bureaucracy.
Below is a list of what you actually need to obtain your RFC number:*
-
- A printout of the appointment confirmation sent by SAT. (I know a couple who prepared everything but forgot this, and were turned away at the gate.)
-
- Your CURP number. (found on your visa)
-
- Your original visa card.
-
- Proof of address (comprobante de domicilio), e.g. from CFE, Siapa, or an Internet provider, ideally with your name on it. (this is what tripped me up)
-
- USB jump drive (aka flash drive, thumb drive). Some have reportedly had difficulties for not bringing a new USB in original packaging. Your call on whether to bring one you already have or buy it new. Required for citizens and permanent residents only.
* As of August 2023. I cannot confirm that this list will work for Mexican states other than Jalisco.
Since Mexican bureaucracies love paper and often ask for copies of required documents that then go right into the trash, I suggest that you also bring the following things, even though they aren’t required:
-
- A copy of your comprobante de domicilo.
-
- A second proof of address if for some reason they don’t accept the first one.
-
- A copy of your residency visa card. (front and back)
-
- A copy of your passport information page.
And for good measure, I suggest you also bring:
-
- Your original passport.
-
- A mask. (at a recent INM appointment, anyone without a mask was refused entry, even though Jalisco eliminated its public mask requirement back in May 2022)
By following these instructions I hope your interactions with SAT will go more smoothly than ours. And if you have first-hand experience with the RFC process lately, I’d love to hear how it went for you! Please share your thoughts in the comments below.

